Customizing your motorcycle helmet not only enhances its appearance but also reflects your personal style and creativity. Knowing how to paint a motorcycle helmet allows you to transform a standard piece of safety gear into a unique masterpiece. This comprehensive guide will walk you through each step of the painting process, ensuring a professional and durable finish that stands out on the road.
 Preparing Your Workspace for Helmet Painting
Before diving into the painting process, setting up an appropriate workspace is crucial. A clean, well-ventilated area with ample lighting will make the task easier and safer. Additionally, organizing your materials beforehand ensures a smooth workflow.
Ensuring Proper Ventilation
When painting a motorcycle helmet, you will use various chemicals and paints that emit fumes. Therefore, choosing a well-ventilated space is essential to avoid inhaling harmful vapors. If indoors, open windows and use fans to circulate air. Alternatively, consider setting up your workspace outdoors on a calm day.
Gathering Necessary Materials
To achieve the best results, gather all necessary materials before starting. You will need:
- Motorcycle helmet
- Sandpaper (various grits)
- Primer suited for fiberglass or the helmet’s material
- High-quality spray paint or acrylic paint
- Clear coat finish for protection
- Painter’s tape and masking paper
- Protective gear (gloves, mask, and goggles)
- Drop cloths or newspapers to protect your workspace
Protecting Your Workspace
Lay down drop cloths or newspapers to shield your work area from paint splatters and spills. Additionally, wear protective gear, including gloves, a mask, and goggles, to safeguard yourself from fumes and accidental paint exposure.
Step-by-Step Process: How to Paint a Motorcycle Helmet
Understanding how to paint a motorcycle helmet requires following a detailed, step-by-step process. Each stage is vital to ensure a smooth, long-lasting finish that enhances both aesthetics and durability.
Step 1: Clean the Helmet Thoroughly
Begin by cleaning your helmet to remove any dirt, oils, or residues that could interfere with the paint’s adherence. Use mild soap and water, then rinse thoroughly. Allow the helmet to dry completely in a dust-free environment before proceeding.
Step 2: Sand the Helmet’s Surface
Sanding is a critical step in preparing the helmet for painting. Use medium-grit sandpaper (around 400 grit) to lightly sand the entire surface. This process creates a slightly rough texture, promoting better paint adhesion. After sanding, wipe the helmet with a damp cloth to remove any sanding dust.
Step 3: Apply a Primer Coat
Applying a primer is essential for ensuring that the paint adheres properly to the helmet’s surface. Choose a primer compatible with the helmet’s material, whether it’s fiberglass, polycarbonate, or another substance. Evenly spray a thin coat of primer, ensuring complete coverage. Allow the primer to dry according to the manufacturer’s instructions, typically for about 24 hours.
Step 4: Mask Off Areas You Don’t Want to Paint
Use painter’s tape and masking paper to cover areas of the helmet you wish to keep unpainted, such as visors, straps, and ventilation areas. Carefully apply the tape to prevent paint from seeping underneath, maintaining clean lines and avoiding unwanted paint on sensitive parts.
Step 5: Apply the Base Coat
With the helmet properly primed and masked, it’s time to apply the base coat. Choose a high-quality spray paint or acrylic paint in your desired color. Shake the paint can thoroughly before use to ensure an even consistency. Apply multiple light coats rather than one heavy coat to prevent drips and achieve a smooth finish. Allow each coat to dry completely before applying the next.
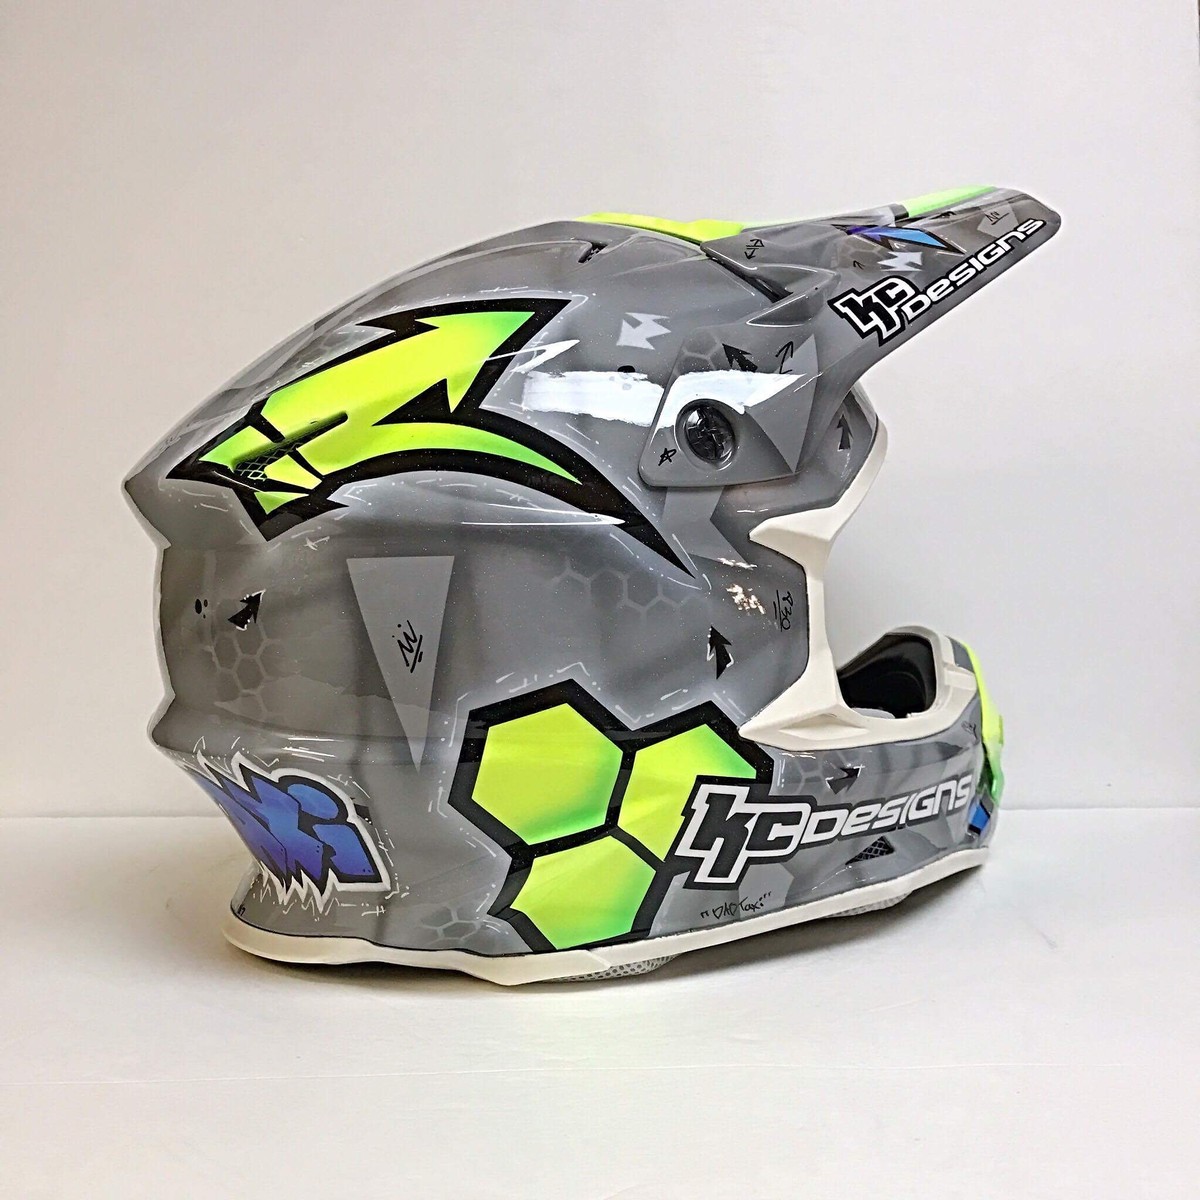
Step 6: Add Custom Designs and Details
This stage allows you to personalize your helmet further. Use stencils or freehand techniques to add patterns, graphics, or other designs. Airbrushes offer precision for intricate details, while spray paints can be used for broader patterns. Take your time to ensure that each design element is applied smoothly and evenly.
Step 7: Seal with a Clear Coat
To protect your paint job from scratches, chips, and UV damage, apply a clear coat finish. Select a clear spray sealant compatible with your chosen paint type. Like the base coat, use multiple light layers, allowing each to dry thoroughly before adding the next. The clear coat not only enhances the color’s vibrancy but also adds a glossy or matte finish, depending on your preference.
Step 8: Remove Masking and Final Touches
Once the clear coat has dried completely, carefully remove the painter’s tape and masking paper. Inspect the helmet for any missed spots or imperfections. If necessary, perform touch-ups with the paint or clear coat to achieve a flawless finish. Allow the helmet to cure fully before using it to ensure maximum durability.
 Essential Tips for a Professional Finish
Achieving a professional-looking painted helmet requires attention to detail and adherence to best practices. Here are some essential tips to enhance the quality of your work:
Use High-Quality Paints and Primers
Investing in high-quality paints and primers ensures better adhesion, durability, and color vibrancy. Cheaper alternatives may result in peeling, fading, or uneven finishes over time.
Apply Multiple Thin Coats
Rather than applying a single thick coat, multiple thin layers provide a smoother, more even appearance. Thin coats also reduce the risk of drips and runs, which can be challenging to fix once dried.
Maintain Consistent Spray Distance
Keep the spray can at a consistent distance from the helmet, typically around 8-12 inches. This consistency prevents uneven paint distribution and ensures a uniform finish across the entire surface.
Allow Adequate Drying Time
Each layer of paint and primer needs sufficient time to dry before applying the next. Rushing the drying process can lead to smudges, uneven textures, or compromised adhesion.
Practice on a Test Surface
If you’re new to helmet painting, consider practicing on a separate piece of material before working on the helmet. This practice allows you to become familiar with the paint’s behavior and adjust your technique accordingly.
Common Mistakes to Avoid When Painting a Helmet
While the process of how to paint a motorcycle helmet is straightforward, avoiding common mistakes can save you time and ensure a better finish. Here are some pitfalls to watch out for:
Skipping the Cleaning Stage
Failing to clean the helmet thoroughly can result in paint not adhering properly, leading to peeling or flaking over time. Always prioritize cleaning as the initial step.
Using Low-Quality Materials
Subpar primers and paints can compromise the durability and appearance of your paint job. Opt for reputable brands known for their quality and reliability.
Applying Uneven Layers
Uneven application of paint can create an unprofessional look with streaks and rough patches. Strive for consistency by applying multiple thin, even layers.
Ignoring Ventilation Needs
Painting in a poorly ventilated area can lead to uneven drying and cause health hazards due to inhaling fumes. Always ensure proper ventilation throughout the process.
Rushing the Drying Process
Impatience during drying times can result in smudges or incomplete curing, affecting the helmet’s finish and longevity. Adhere to recommended drying times between each step.
 Choosing the Right Paint and Finishes
Selecting the appropriate paint and finishes is crucial for both aesthetic appeal and durability. Different types of paints offer varying levels of flexibility, resistance, and finish styles.
Types of Paint Suitable for Helmets
- Acrylic Paints: These are versatile and easy to work with, offering vibrant colors and good coverage. They are suitable for detailed designs and can be sealed with a clear coat for added protection.
- Enamel Paints: Known for their durability and glossy finish, enamel paints are excellent for creating smooth, professional-looking surfaces. They require longer drying times but provide superior resistance to wear and tear.
- Spray Paints: Ideal for larger areas and base coats, spray paints offer even coverage and are relatively quick to apply. They come in various finishes, including matte, satin, and glossy.
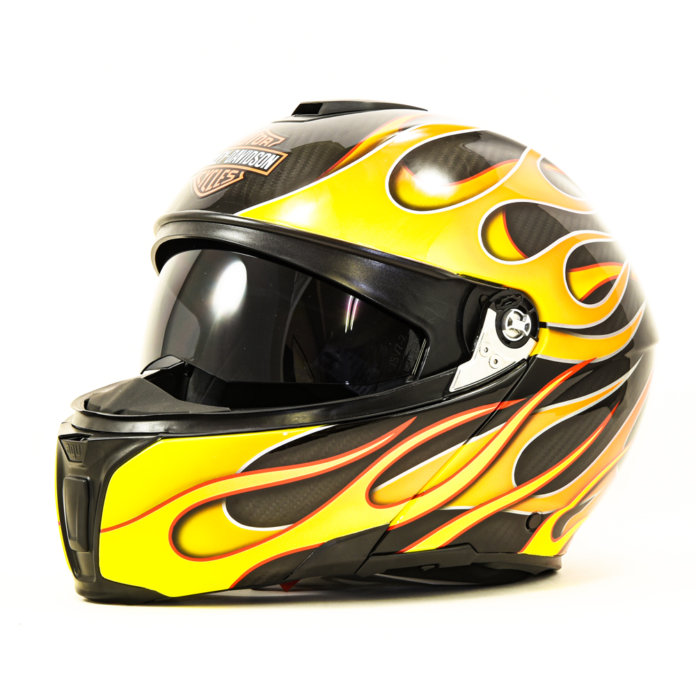
Choosing the Right Finish
The finish you choose affects both the helmet’s appearance and functionality:
- Glossy Finish: Provides a shiny, reflective surface that highlights colors and designs. It offers good protection against UV rays but may show scratches more easily.
- Matte Finish: Offers a non-reflective, subdued appearance that can make colors appear richer. It is better at concealing minor scratches but may require more maintenance to keep looking fresh.
- Satin Finish: Balances between glossy and matte, providing a slight sheen without being overly reflective. It offers good durability and a versatile look suitable for various styles.
Maintaining Your Painted Helmet
Once you have successfully painted your motorcycle helmet, proper maintenance is essential to preserve its appearance and integrity. Here are some tips to keep your helmet looking its best:
Regular Cleaning
Clean your helmet regularly using mild soap and water. Avoid using harsh chemicals or abrasive tools that can damage the paint. Gently wipe the surface with a soft cloth to remove dirt and grime.
Avoid Direct Sunlight
Prolonged exposure to direct sunlight can cause colors to fade and degrade the paint over time. Whenever possible, store your helmet in a shaded area or use a protective cover to shield it from UV rays.
Handle with Care
Be mindful when placing or handling your helmet to prevent scratches and chips. Store it in a padded case or on a helmet stand to minimize contact with hard surfaces.
Inspect for Damage
Periodically check your helmet for signs of paint damage, such as chips, cracks, or peeling. Addressing these issues promptly by touching up the paint can prevent further deterioration and maintain the helmet’s protective qualities.
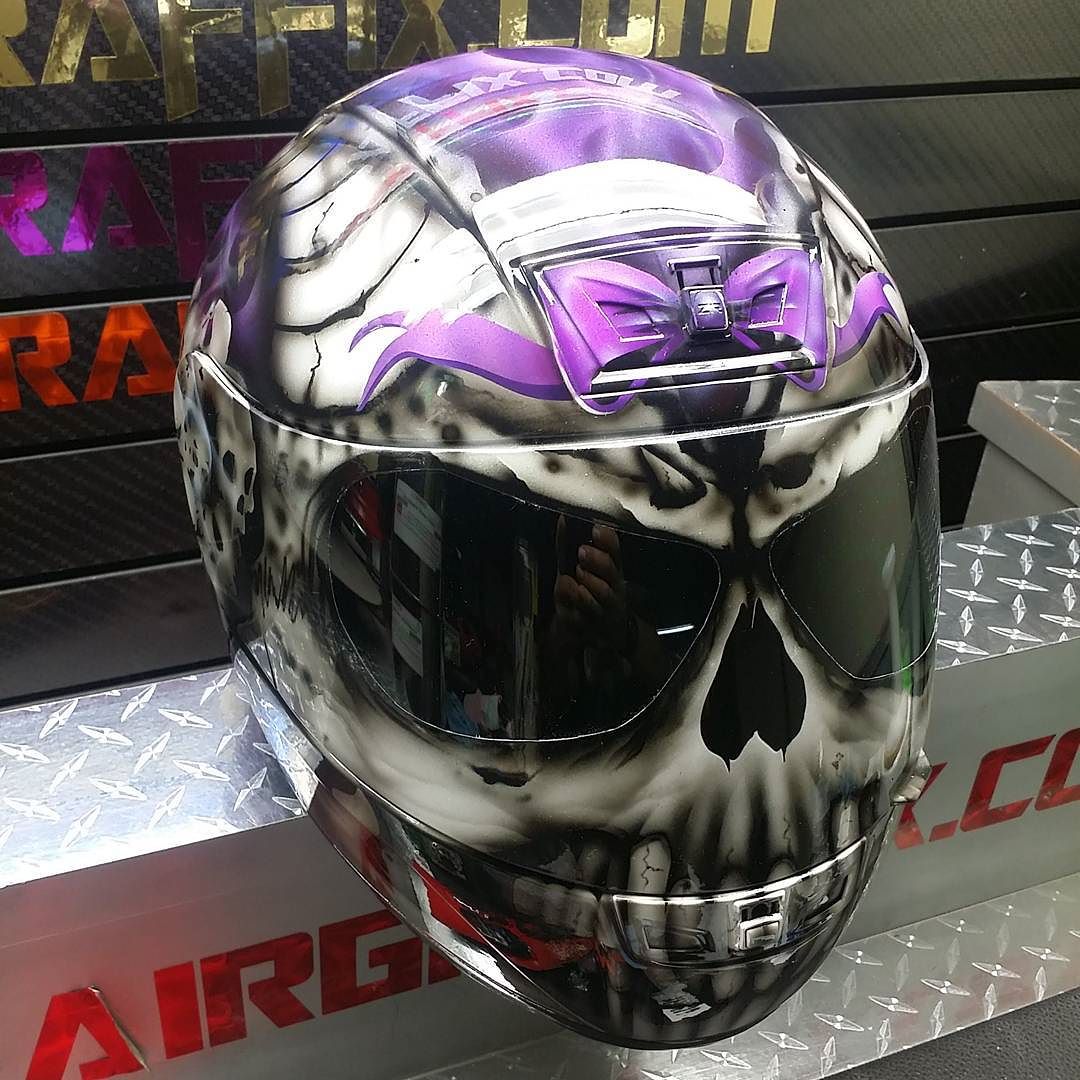
 Advanced Techniques for Helmet Painting
For those looking to take their helmet customization to the next level, incorporating advanced techniques can achieve more intricate and professional results. Consider the following methods:
Airbrushing
Airbrushing allows for precise control over paint application, making it ideal for detailed designs, gradients, and seamless color transitions. Investing in a quality airbrush setup and practicing your technique can significantly enhance your helmet’s aesthetic appeal.
Decals and Vinyl Wraps
Adding decals or vinyl wraps can introduce complex patterns and graphics without the need for freehand painting. These elements can be layered over the base coat to create unique and personalized designs.
Hydrographics
Hydrographics, also known as water transfer printing, enables the application of intricate patterns and textures onto your helmet. This technique involves floating a film with the desired design on water and dipping the helmet into the water to transfer the pattern evenly.
Metallic and Pearlescent Finishes
Using metallic or pearlescent paints can add depth and shimmer to your helmet’s finish. These specialized paints reflect light differently, creating a dynamic and eye-catching appearance that changes with movement and angle.
Safety Considerations When Painting a Helmet
While customizing your helmet, it’s essential to prioritize safety to ensure that the helmet continues to provide optimal protection. Here are some safety considerations to keep in mind:
Avoid Compromising Structural Integrity
Ensure that the painting process does not alter the helmet’s structural integrity. Do not sand excessively or remove important components, such as ventilation ports or padding, that contribute to the helmet’s safety features.
Use Compatible Paints
Choose paints and primers that are compatible with the helmet’s material. Using incompatible substances can weaken the helmet or cause harmful reactions that compromise its protective qualities.
Maintain Reflective Elements
If your helmet includes reflective strips or elements, ensure that painting does not cover or obstruct these features. Reflective elements enhance visibility and safety, especially during low-light conditions.
Allow Proper Curing Time
After painting, allow the helmet to cure fully before wearing it. This ensures that the paint has bonded correctly and that the clear coat is fully hardened, preventing any paint layers from flaking off during use.
The Importance of a Personalized Helmet
Customizing your helmet through painting not only enhances its visual appeal but also contributes to your overall riding experience. A personalized helmet stands out among others, allowing you to express your individuality and creativity. Moreover, investing time and effort into customizing your helmet fosters a stronger connection to your gear, making each ride more enjoyable and satisfying.
 How to Paint a Motorcycle Helmet: Final Steps
Now that you are familiar with the process and techniques of how to paint a motorcycle helmet, follow these final steps to ensure a flawless finish:
Let the Helmet Cure Completely
After applying the final clear coat, allow the helmet to cure in a dust-free environment. This process typically takes several days, depending on the paints and clear coats used. Proper curing ensures maximum durability and longevity of the paint job.
Inspect the Finished Helmet
Once fully cured, closely inspect the helmet for any imperfections, such as uneven paint coverage or missed spots. Addressing minor issues with touch-ups can enhance the overall quality of your customization.
Reassemble and Test Fit
After painting, reattach any removed components, such as visors or padding. Ensure that all parts fit correctly and that the helmet remains comfortable and functional. Wearing the helmet post-customization allows you to confirm that the paint process has not affected its safety features or fit.
Conclusion: Mastering How to Paint a Motorcycle Helmet
Understanding how to paint a motorcycle helmet opens up a world of creative possibilities, allowing you to personalize your safety gear while maintaining its protective qualities. By following this comprehensive guide, you can achieve a professional-looking finish that not only enhances the helmet’s appearance but also ensures its durability and functionality. Whether you’re a seasoned rider or a beginner looking to add a unique touch to your gear, mastering the art of helmet painting provides a rewarding and practical skill that elevates your riding experience.